Latex Technical Details - Understanding Technical Aspect Of LaTex
Here we discuss some LaTex technical details. They should be sufficient to help you understand the contents of the application component files. The description is somewhat technical, but this page is prepared for those, who want to extend or change the editor so we assume some prior technical knowledge. A more detailed description will be provided in our technical documentation, which will be published in a few months.
Language Resources
LEd is a multilingual tool. All texts appearing in the editor are stored in language resource (LR) files. These files are stored in the Languages directory. To distinguish resources for different languages, the extensions of all language files are Windows® language identifiers (see MSDN documentation for details). Each LR file begins with a header similar to the one shown in the following table.
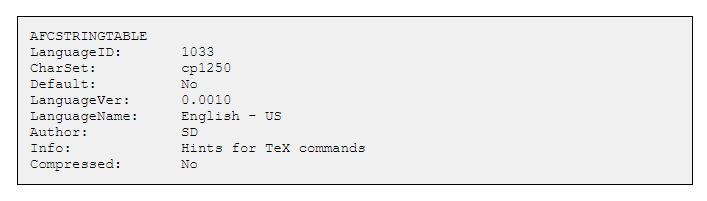
The first row contains the string denoting that this is a LR file. The language ID is a Windows® language identifier for the actual file. After the language ID, the default code page is given. This is necessary to correctly show national characters when we use LEd with a language different than the operating system's language. The fourth row contains information (yes/no) on whether the definitions in the file are active by default during the first execution of LEd on the computer.
Language name is only a comment. Data stored in the Info field describes the contents of the actual file. It appears in the LEd options. The last line of the header denotes whether the file is compressed or not.
All the LR files can be compressed using the LEd.exe program (see LEd command line parameters for details). The compressed files have the same header (except for the Compressed field value) but the contents after the header is compressed using the ZLib algorithm. The compressed files can be decompressed at any time in a similar way; however, LEd can use both compressed and plain LR files (the only difference is the file size).
After the header, language resources are stored in separate lines. In general, each LR is stored in one line, but if the first non-white character of the line is <, the actual row is a continuation of the previous one. A sample LR is shown in the following table.

Each LR starts from a unique number (LR ID) which can be any number from 1 to 2,000,000,000; however some numbers (lower than 1,000,000) are reserved by LEd and cannot be defined by users. After a white character, a so-called, "nicetext" appears.
Nicetexts
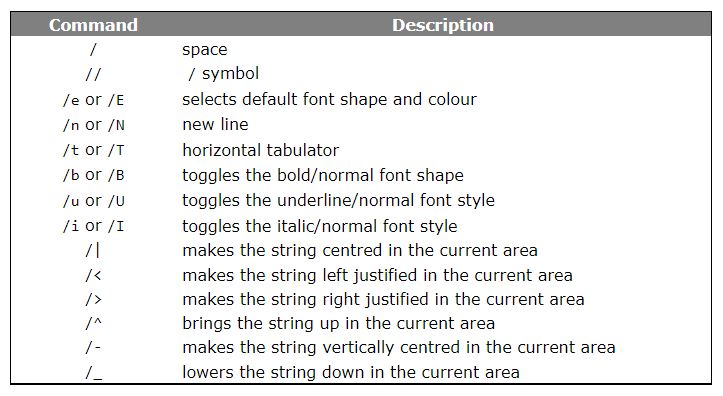
All the strings appearing anywhere in LEd (in editor windows, dialog boxes, menus, hints, etc.) are nicetexts. A nicetext is a formatted string. We decided to introduce nicetexts instead of using, e.g., HTML to make the size of LR files small. Nicetexts have all the necessary properties for our purposes; in addition, they are small and simple.
The formatting commands belong to three groups: NT1, NT2, and NT3.
The NT1 commands have no parameters. They are listed in the following table.
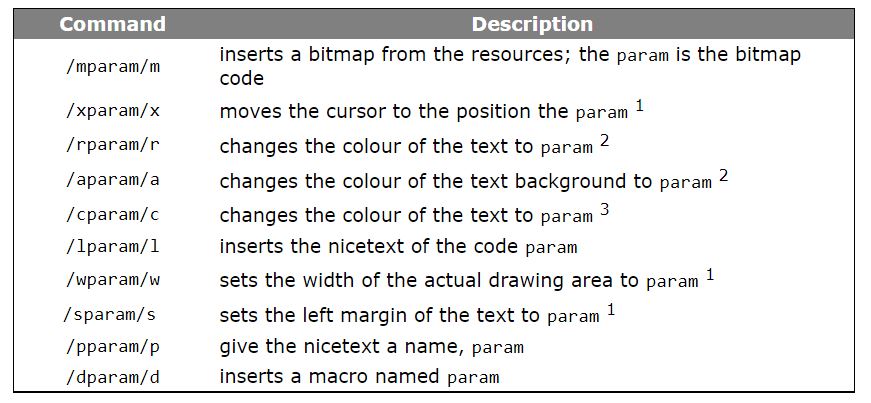
The NT2 commands take one parameter given between tags. The commands are described in the following table.
Notes:
If the parameter is an integer number, then it means the size in pixels. If the parameter is a float number, then it means the size in pixels times the font height.
The color is a hexadecimal number of 8 hex-digits. It denotes the color in the same way as Windows® does.
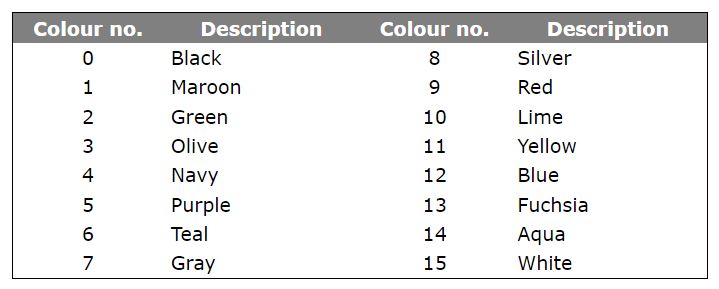
The parameter is an integer from 0 to 48 and selects a predefined color (see the following table for some of the predefined colors, the other can be found in the documentation).
The NT3 commands are more complex. Currently only one command from this group exists (see the following table).

The syntax of the command is:
- <configuration> = (<col>, <row>) <conf_list>
- <conf_list> = <conf> | <conf>, <conf_list>
- <conf> = (<c>, <r>) [l<size>] [h<size>] [N<thickness>[:<colour>]] [S<thickness>[:<colour>]][W<thickness>[:<colour>]] [E<thickness>[:<colour>]] [c<colour>]
- <size> = A | <integer_number> | <real_number>
- <colour> = <integer_number> | r<integer_number>
- <thickness> = <integer_number>
- <col> = <integer_number>
- <row> = <integer_number>
- <c> = <integer_number> | _
- <r> = <integer_number> | _
- <cells> = <cell> | <cell>/,<cells>
- <cell> = <nicetext>
Note: The cells are numbered starting from 0.
To make the preparation of nicetexts easier, we published the NTFTester program at the download page. It is a simple editor of nicetexts, which shows in real time how the nicetext will be presented by LEd.
Filters
All edited files are preprocessed by the filtering mechanism whenever they are opened or saved by the editor. There are several ready-made filters; however users can create their own.
The filtering mechanism is generally provided to help handle national characters. For example, in Polish, there are several possibilities of coding such characters, e.g., a letter ó (o acute) can be encoded as /o, \'o, or "o depending on the package used for Polish characters. The simplest way for the user is to write just ó without worrying about how the letter will be stored in a file.
Dictionaries
A built-in spelling checker can be used for a number of languages; however, in the standard package, the dictionariesfor only three languages are included: American English, British English, and Polish. Other dictionaries will be published on the download—add ons page in the future.
It is also possible for the user to create his own dictionary. You need a list of correct words for the language. Many free word lists are available on the WWW. Some of the best ones are those prepared for the ISPELL and ASPELL spelling checkers.
LEd stores the word list as a deterministic finite state automaton, which is a highly compressed representation of the lexicon (e.g., our plain Polish lexicon occupies about 60 MB, but the automaton represents it in only about 1.2 MB), relating to the algorithm described in the paper Ciura M., Deorowicz S., How to squeeze a lexicon, Software—Practice and Experience, 2001; 31(11):1077–1090. In fact, the *.dic files are even more compressed using a specialized compression algorithm, but they are decompressed in memory to the automata when LEd starts.
The automaton can be produced from a file storing a sorted list of words for the language using LEd. One need only run LEd and use Configuration/Dictionaries from the main menu. It is also possible to extend an existing dictionary with new words, remove some words from the dictionary, and list all the words in the dictionary to a textual file.
Users can also prepare thematic dictionaries for their fields of interest, e.g., astronomical, biological, etc. In the standard package, there are dictionaries for mathematics and computer science.
The dictionary file is necessary for spelling checking. For spelling correction, however, a file (*.ld) with rules of correction of errors typical for the language users is also necessary. In the near future, a paper describing the construction of the rules will be published. We will add a URL pointer to the paper to help users provide their own correction rules.
LEd Command Line Parameters
The application can be executed in several ways.
Simply Running The Editor
The editor can be started by clicking an icon on the desktop or by typing in the command line:

File Compression And Decompression
LEd has built-in compression/decompression routines based on ZLib. It is possible to compress most of the application components, e.g., language resource files to save space. LEd can directly use both plain and compressed LR files so storing the files compressed saves space. The command syntax is:
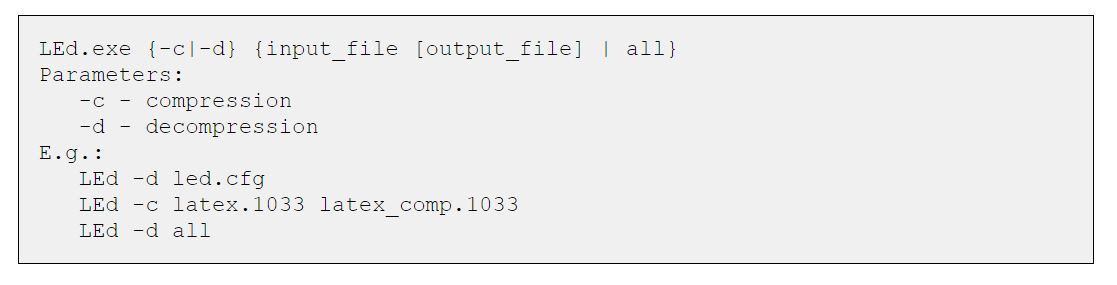
You can compress or decompress single files or, using the parameter all, all the files in the directories Definitions and Languages, i.e., all the LR files.
Adding Or Removing Graphical Resources
All the bitmaps (icons) displayed by the editor are stored in the resource files (*.crf) located by default in LEd's main directory. With each bitmap a unique number is related. In the nicetexts, the bitmaps can be shown thanks to the /m command, whose parameter is a bitmap number. To add new resources you should execute LEd using the following parameters.
The bitmaps are stored in the resource file in a compressed form. The compression algorithm is optimized to the compression of small icons.
Resources can be also removed from the resource file. To do this follow the syntax given below.

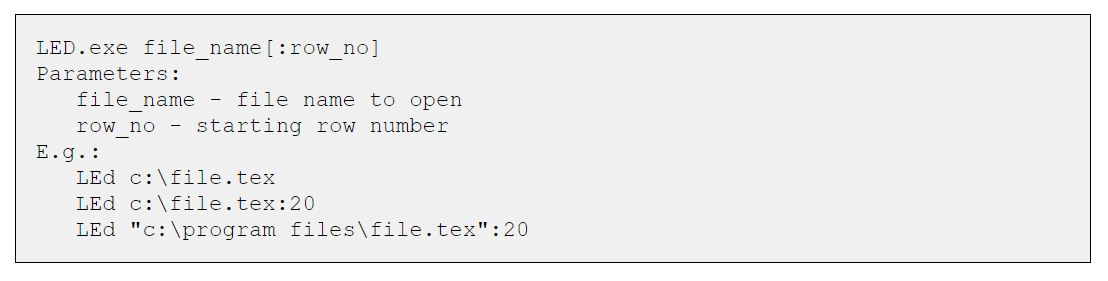
Opening A Given File
LEd can open a given file and move it to the specified row number. To do this please follow the syntax:
Inserting A Given Text
LEd can insert a given text at the current cursor position in the active file. This way you can add something to LEd from external programs.